
Beginning To Electro Etching Knives
In a lot of ways, I am old school when it comes to blade marking. Traditionally, before the age of electricity and etching, hot stamping and hand chiseling/engraving your name or mark on blades was the only way to do it. When I started out, it was with a cold press makers mark that was put in a striking tool, which was gifted to me. It was an Evers E6HR and it worked. The largest problem I found with the design, and my use, was that striking would skip the blade, and replacement would be difficult if not impossible. So, one shot, one stamp, no take backs. I screwed up a few blades this way.
The second iteration of this was utilizing a cold press stamp that went into a hydraulic press, which is what I use today. The stamp is expensive to make, and the press is from a fellow that is out of business now, and I acquired it after I purchased my mentor John Weever’s knife business of him. It works great, is accurate, and most detrimentally to the marking process, can cause stress risers in the steel if it’s not thick enough.
As a result of all of this, and also venturing into smaller knives, I wanted to have the ability to etch my stamps.
There are a few things you need to consider when choosing an etching process. Mainly:
Power Source
How you source your stencils
Electrolyte
Etching process
Power Source
Firstly, there are a wide array of power sources to choose from. Everything from Professionally made, to DIY, to alternate purpose, such as a car battery charger and power supplies.
For the power source, there are two main functions that make up the required elements to etch a blade. DC current performs a deep etch by removing material utilizing electrolyte. AC creates oxides that adhere to the blade and darken it. Amperage is also a consideration, and I’ve seen others use anywhere from 2-20 amps. By and large, the most frequently used is 2-5a.
You can choose to utilize a power supply that only uses AC power, and you’ll not deep etch anything, but you’ll have a superficial dark mark on the blade. This can be problematic if you require hand sanding later on, and it also removes the mark with normal wear and tear.
If you utilize DC only, you’ll etch the blade steel, but it will not leave the oxides during AC cycling that crisps up the mark. To get around this, you can use a colorant such as Black Brass Metal Finish by Birchwood Casey. I chose to go this route, for two reasons. Buying an electro etcher usually starts at around $250. Building one, typically $110-$120. Buying a DC Power Supply, $70.
Stencil Sourcing
There quite a few processors of stencils. Because I have only utilized one so far, and haven’t tested their stamps, as I’m just getting started, I’ll list them, and review the stencils once I get a little further along. I have done plenty of research, testing, and etching without stencils before, so take the stencil provider n00b experience with a grain of salt.
Lectroetch Inc. is a business in Ohio that I got as a referral from another knife maker. Britt over there was extremely communicative, and walked me through their process quickly. If you have a logo design, they will create their files off of this, so really, your imagination and the limitations of the stencil medium are pretty much it. Their stencils are a “…synthetic woven fabric base impregnated with the 3L plasticized coating…” and opposed to vinyl stamps that you can print on a Cricut or Silhouette, hold up beyond one or two uses.
I emailed sales@ and got quick turnaround. That’s what I like. If I am going to figure out concepts and test results, I prefer to fail forward fast. Iteration is the name of the game.
Electrolytes
In effect, an electrolyte is the conductive medium for the current used within elecro etching. Sources are many for manufactured electrolyte, but the main ones seem to be from International Marking Group (IMG), and Lectroetch.
For many DIY’ers, the electrolyte can be made up of water and salt, with the potential to substitute water for vinegar, which may increase reaction times and etch depth. Recipes are varied for home made electrolyte, up to and including snakes blood, I am sure. But the main component is liquid that carries the electrolyte, to form a reaction when current is passed through it. You gamble with consistency when mixing it yourself, and for the time I have on a blade, I’d rather it be done right the first time, and nothing left to chance on the exact mixture. With that being said, for other projects I’ve mixed salt in water before, and it’s performed alright.
Etching Process
Some of the best videos on knife making I have watched are from Kyle Royer Knives. His new knife making curriculum is definitely something to check into. As part of his promotion of that course, he plugged his etching process in his YouTube video - Hunting Knife Part 1. There, you can signup for his newsletter, and get the video on etching sent to your email.
I don’t have a lot to say about the process other than what Kyle has already said. I plan on using the same process. DC current w/ electrolyte, and Black Brass to darken it.
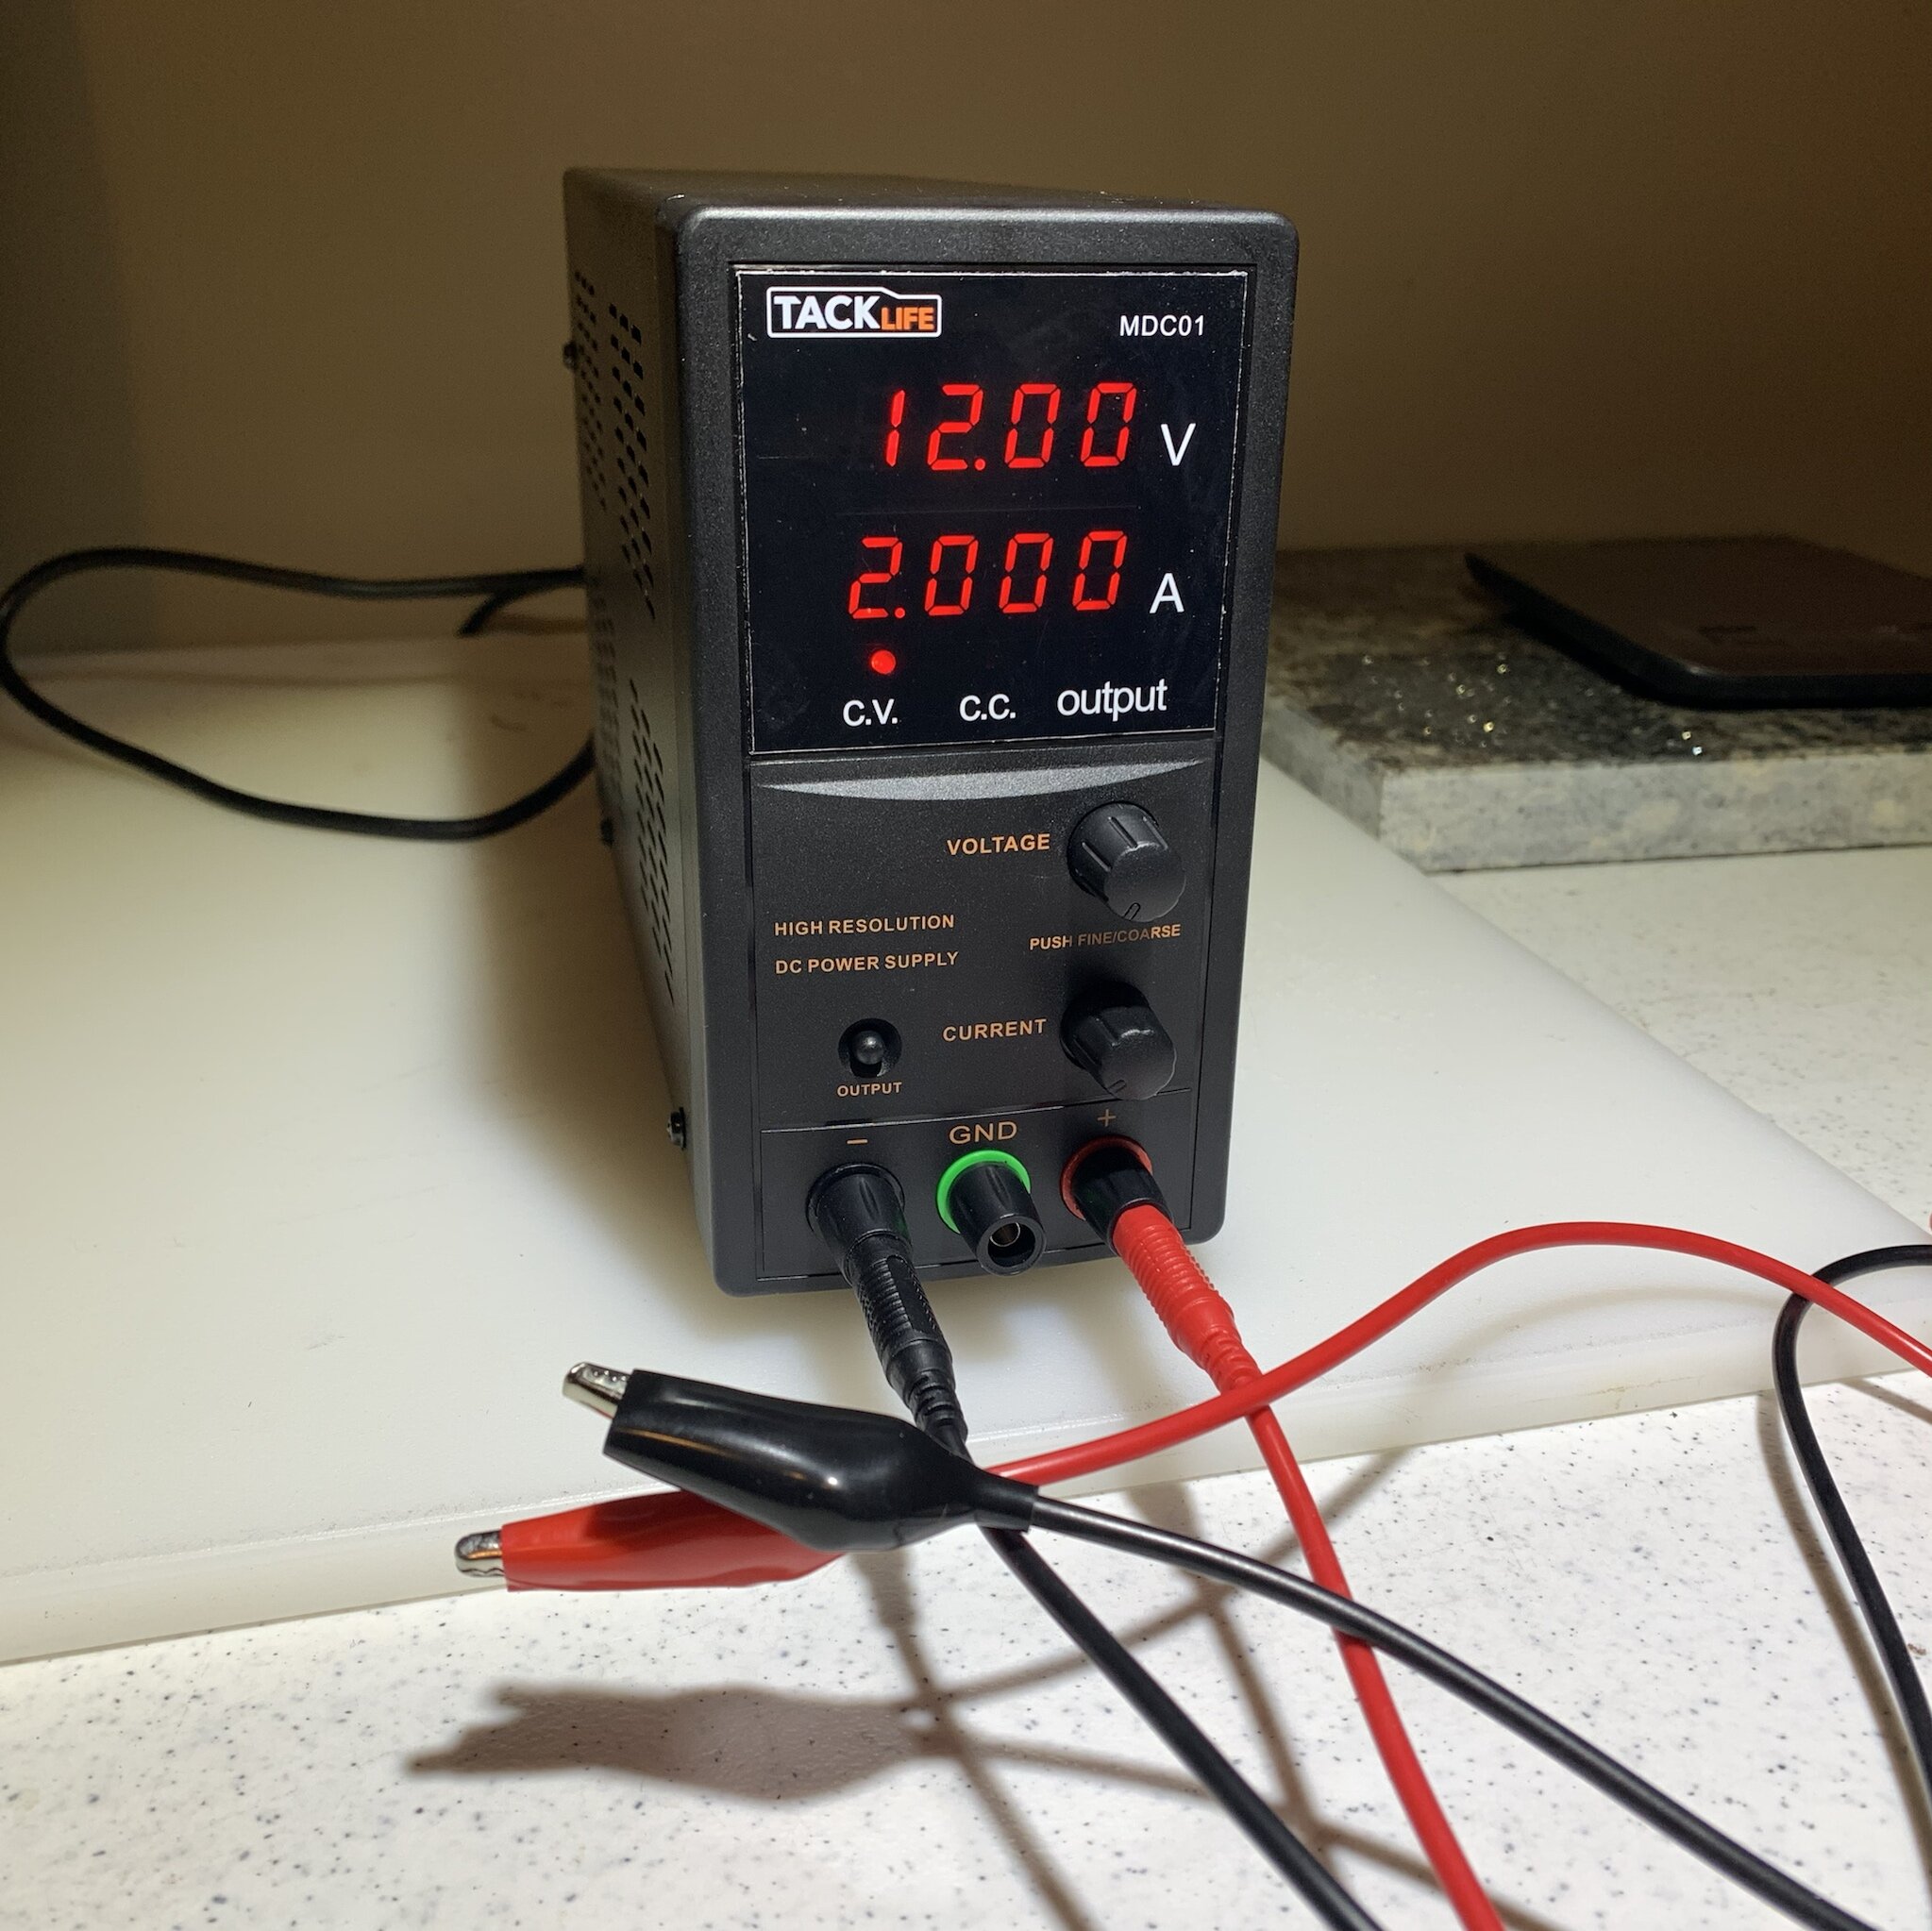
This unit is the Tack Life MDC01 Variable Voltage/Amperage Power Supply. It goes up to 30V, 5A and includes alligator clamps. I like it because I can adjust the voltage and amperage to suit the project. Whereas High Carbon steel can be etched at a lower voltage/amperage, stainless more aggression, and more cycling, because the metal composition is designed to deter corrosion.
Another element of why I wanted a variable power supply is because I would prefer not burning out my stencils after a few uses. This allows me to fine tune the voltage and amperage to get as much life out of my stencils as possible without burning them.
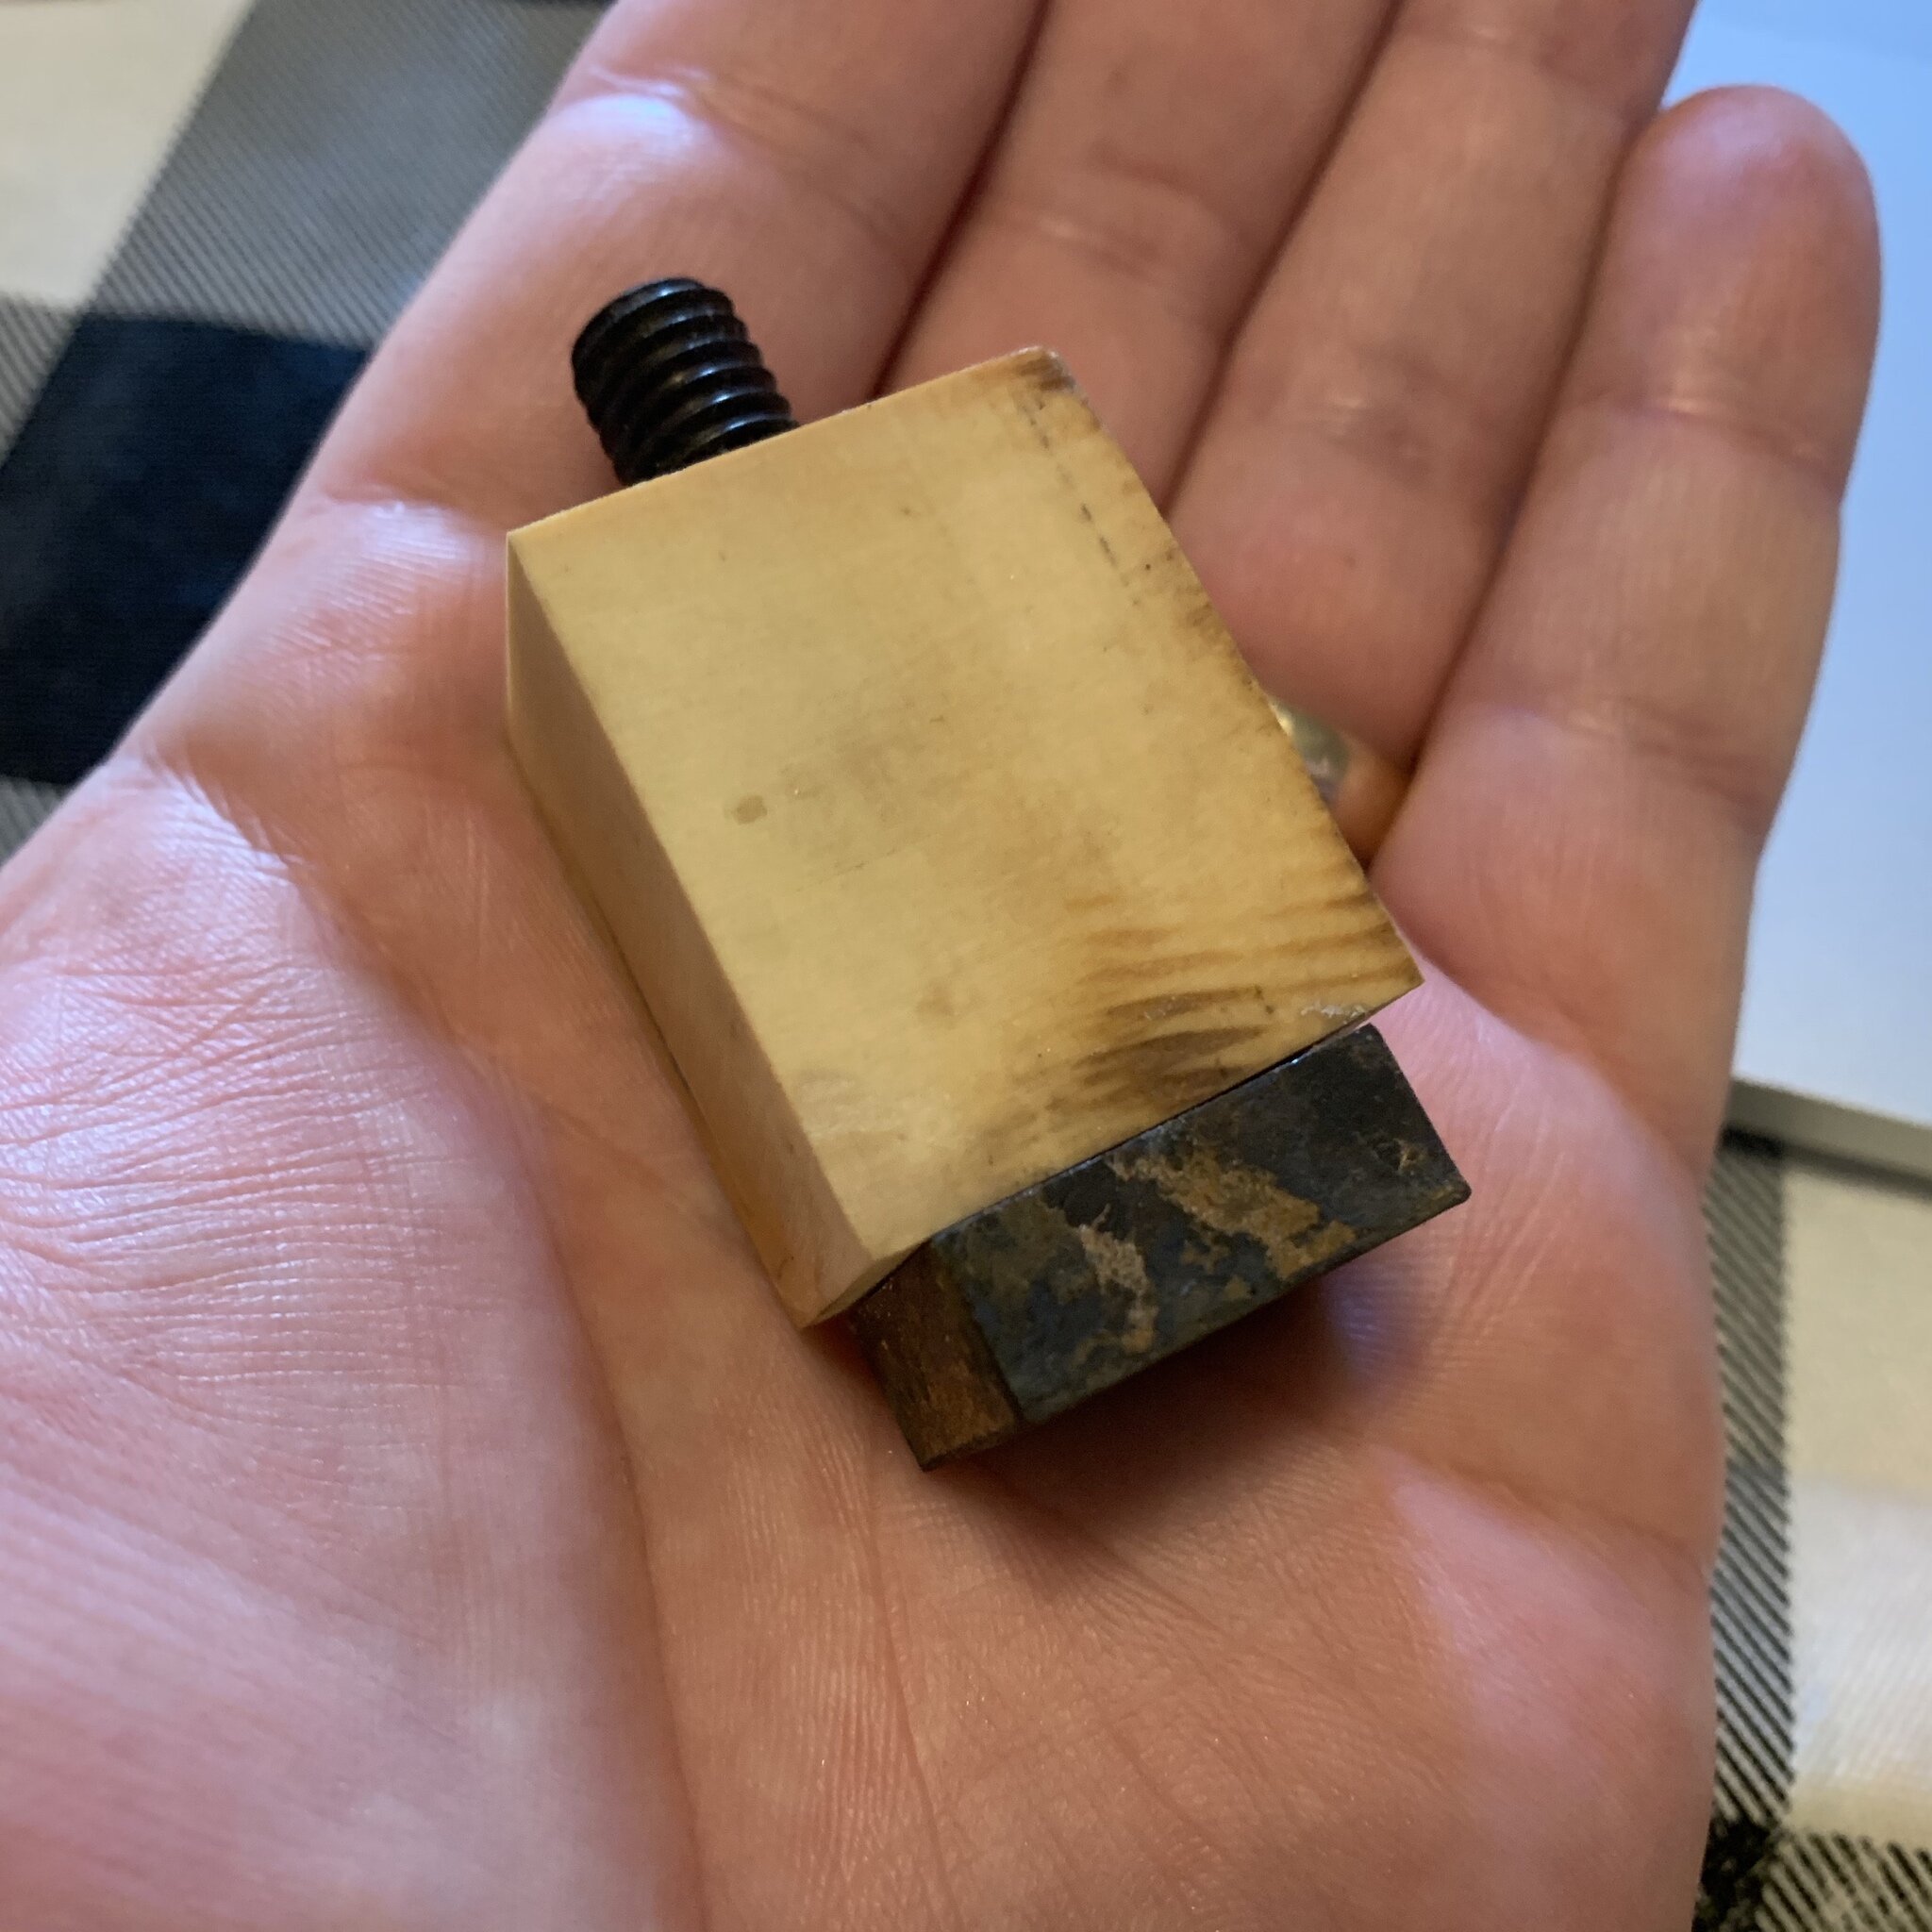
The next thing I did after purchasing the power supply was to make an electrode. This is some paper micarta I had laying around, with a milling machine clamp bolt. I drilled it just shy of 3/8” and friction secured it. In other works, I pounded the block into the block until it was through, and snug.
The electrode gets wrapped at the tip with felt, and that felt rubber banded to the block. It then is dipped in your electrolyte and dried to not be sopping wet, and then connected to your gator clamp, where the positive is attached to the bolt, and the negative to your blade, and you’re off to the races.
In Conclusion
I am sure I will have a ton of feedback on the etching process once the stencils get in. I plan on diving into electrolytes, different electrode designs, power supply settings, and such. There are a ton of videos out there on YouTube to go over the actual process, but look at Kyles for sure. His is the best in my opinion. Why? Because his technique accounts for a lot of the caveats of using a stencil, and getting a very favorable etch. HIs processes for layout, tape up, evaluating results, and finish, are all encompassing. If you want intel on electrolyte creation and making your own etching machine, there are videos out there that I will likely cover at some point here, but the process, his is money.